Fly tying tips: how to tie the copper nymph
5 min read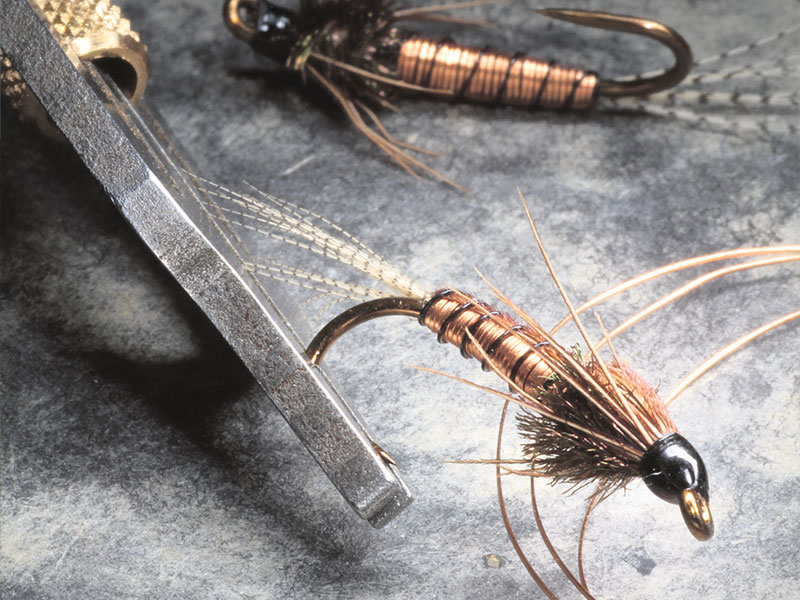
In his recently published book, Flyting for Beginners, writer Barry Ord Clarke takes readers through a guide on 12 popular international fly patterns. Each technique and pattern includes guidance and instructions on all tools, materials, and techniques used; step-by-step images; explanatory text; and a QR code that links a video tutorial on the writer’s YouTube channel. The book also includes Barry’s recommendations for a beginner’s fly tying kit and materials and lots of useful advice and tips – perfect for those new to the art of tying flies. Below is an extract.
Two of the best-selling fly patterns in the world are the Copper John and the Brassie. Then came the Copper Nymph, in so many variants that it would take a whole book to cover them.
What all three patterns have in common is a copper wire abdomen. This is my take on the Copper Nymph.
The copper wire abdomen adds extra weight to the pattern. It also adds some extra bling, and when it comes to river trout, they just love bling!
For this pattern, I have taken the best materials for trout flies: pheasant tail, wood duck and peacock herl, along with the relatively new flat copper wire. All wrapped up in the style of a generic mayfly nymph which can be fished any way and anywhere.
When designing a fly, I always try to push all the trout’s buttons. I study the most prominent features of the natural i.e. tails, legs, head – and exaggerate them. I believe that this way, when the fly is drifting swiftly towards a feeding trout in pocket water, it’s easily recognisable as food, and if you add a little extra bling as well, this may also attract the trout’s attention. If you don’t have wood duck for the tail, you can also use mallard flank, or any other speckled hackle for that matter. All flytyers accumulate more and more material as different patterns are tied over the years. You will, with time, come to understand which materials can be used for what, and what are their best substitutes. The collecting and understanding of the materials we work with are all part of the pleasure of the craft, and something that you can look forward to.
What you’ll learn
- Copper wire wrapped abdomen
- Overbody of pheasant tail
- Reverse pheasant tail legs
Tying tips
- Wrap your copper wire hand-over-hand so you don’t twist it
- Choose a pheasant tail feather with long fibres
- Let the head varnish dry a little in-between coats
- You can use a round, heavy-gauge copper wire if you don’t have flat
The dressing
- Hook: Long shank nymph size 8–12
- Thread: Black
- Tail: Wood duck or mallard flank
- Rib: UTC Ultra Wire (black)
- Abdomen: Flat or round copper wire & pheasant tail
- Thorax: Peacock herl
- Wing case: Pheasant tail fibres
- Legs: Pheasant tail
- Head: Black thread

1. Secure your hook in the vice with the hook shank horizontal. 
2. Attach your tying thread a little behind the hook eye and run a foundation back until your thread lies in line with the hook point. 
3. Now select a nicely marked wood duck or mallard flank feather which we are going to use for the tail. 
4. Strip off a small bunch of fibres from the flank feather, taking care that the tips are aligned. The tail should be about two-thirds of the hook shank length. Tie this in on top of the hook shank as shown. 
5. Cut about 20cm of black UTC Ultra wire. This is a super shiny varnished wire that works perfectly if you want extra bling. 
6. Tie in the wire at the tail base as shown and using your tying thread, build up a slight taper on the abdomen. 
7. You will now need a length of about 25cm of medium flat or round copper wire for the abdomen. 
8. Tie in the copper wire at the tail base and run your tying thread up the hook shank and into the thorax. 
9. Cut a small bunch of cock pheasant tail fibres and tie these in by their tips at the tail base, on top of the hook shank. Take care that the underbody of tying thread is nice and even, this will give a better result when the wire is wrapped. 
10. Take your flat copper wire and start to wrap it, hand over hand, so as not to twist it, in tight touching turns over the abdomen. If you have a rotary vice, you can use that to wrap your wire. 
11. Continue over the body in touching turns until you have covered the whole abdomen with copper wire as shown. Tie off with a few turns of tying thread and snip off the excess copper wire. 
12. Now straighten the pheasant tail fibres so that they are parallel and hold them in position with a couple of turns of tying thread at the thorax. 
13. Take the black wire and make 5–6 evenly spaced open turns over the pheasant tail, to form the rib. Take care to keep the pheasant tail lying flat on top of the hook shank. 
14. Now unwind the couple of turns of tying thread you made in Step 12, and fold back the pheasant tail. The wire rib will hold the pheasant tail in position. Tie off the black wire rib and snip off the excess wire. 
15. Now take another small bunch of pheasant tail fibres, about 10 or 12, and even the tips out. 
16. Measure the tips of the pheasant tail out over the hook eye, so that when they are folded back they are long enough for the nymph legs, and tie down as shown. 
17. This is how the thorax should look now from above. Don’t cut off any of the pheasant tail fibres because these will be the wing case later. 
18. Select a nice long fibre peacock herl 
19. Cut a couple of centimetres off the point of the herl and tie in, with the tip end tight into the abdomen. 
20. Attach a hackle plier to the herl and in close touching turns, wrap this forward over the thorax and secure a little behind the hook eye. 
21. You can now fold the pheasant tail legs back, about half and half on each side and secure with a few wraps of tying thread. 
22. Taking care to keep all the pheasant tail fibres straight and parallel, fold them over and tie down close to the thorax a little back from the hook eye. 
23. Taking care, trim off the surplus pheasant tail over the hook eye at a slight angle. Now starting with your tying thread against the hook eye, wrap your way backwards over the cut ends to form a neat head. 
24. Whip finish, remove your tying thread and varnish a neat black head. You may need to do a couple of coats of varnish. This is the underside view. 
25. Copper Nymph viewed from above. 
26. The finished Copper Nymph is perfect for searching
fast-flowing pocket water.
We’re giving away one copy of Flyting for Beginners. Enter here.
The book is stocked by Nationwide Book distributors NZ and available to buy or order from local bookshops and online.